Before creating a crypto faucet, I recommend that you familiarize yourself with ready-made examples, test one of the options, you should understand how the crypto faucet works, and what features you should pay attention to before creating your own project.
🚀 Welcome! Ready to Create Your Own Crypto Faucet and Start Earning Bitcoin?
If you’ve ever dreamed of building a passive income stream with cryptocurrency, you’re in the right place. This step-by-step guide will show you exactly how to create your own crypto faucet, monetize it, and start receiving real payouts — all with minimal investment and no advanced coding skills.
Whether you’re a complete beginner or already have a website, this guide will help you turn your idea into a working project. Let’s go!
⸻
🔧 What You’ll Do in This Guide:
- Choose reliable hosting (we recommend Hostinger for affordability and ease of use)
- Register a domain (often included for free!)
- Install WordPress — the engine of your faucet
- Add a custom faucet script with reward logic and security
- Connect FaucetPay for instant crypto payouts
- Monetize with shortlinks and AdSense
- Launch and promote your faucet
- Track users, earnings, and scale your project
You’ll also see real statistics and examples based on my own project, which earned $347 in the first 10 days.
🚀 Step 1: Choosing Hosting
If you’re planning to create a profitable crypto faucet, everything starts with reliable hosting. I chose Hostinger.com — it’s the perfect option for both beginners and experienced developers.
Why Hostinger:
• 🔥 Up to 75% off on all plans right now
• 🌐 Free domain included (for plans of 12 months or more)
• 💰 Prices start from just $2.99/month — very affordable
• ⚡️ Fast website loading speed — essential for user retention
• 🛠 Full support for PHP, MySQL, WordPress
• 🧩 1-click WordPress installation
• 🔒 Free SSL certificate — for security and user trust
• 👨💻 Custom hPanel control panel — easier than standard cPanel
• ☎️ 24/7 customer support
• 📶 Stable 99.9% uptime
What to do:
- Go to 👉 Hostinger.com
- Choose the Premium Web Hosting plan (ideal for crypto faucets)
- Get a free domain (with 12-month payment or more)
- Install WordPress in one click — and you’re ready for the next step
Let’s take a closer look at how to order hosting
Step one: Register by clicking on the Login button in the upper right corner.

You can register using a Google account, Facebook account or use email and password.
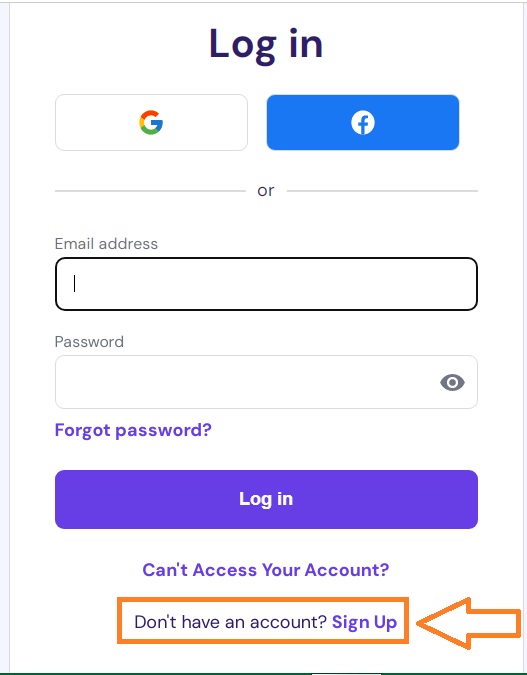
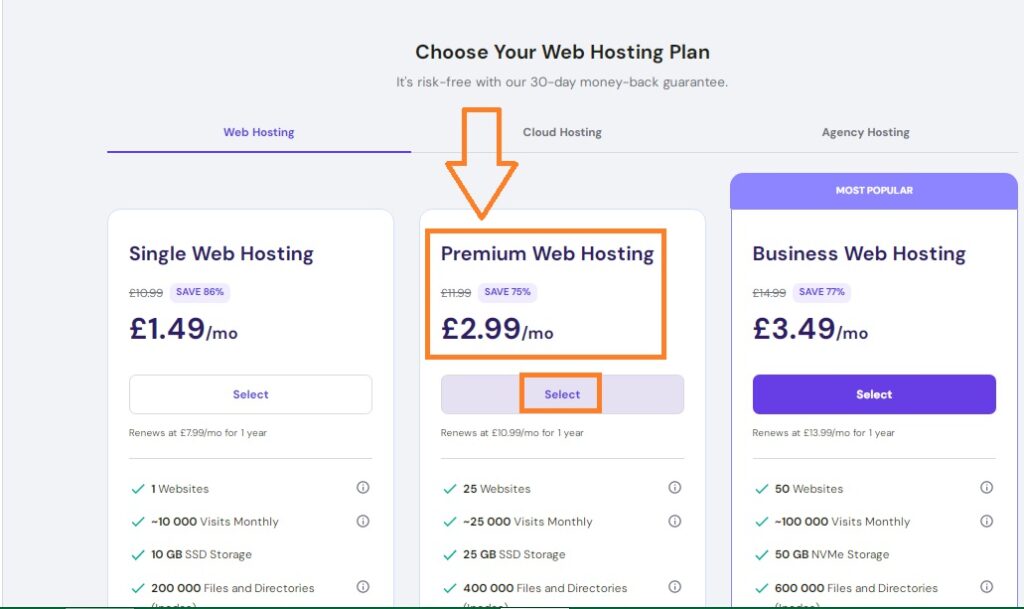
Step two: After registration you will see a suggestion to choose a hosting plan: click on the button — «Explore plans»

Step three: I recommend choosing: Premium Web Hosting, it is ideal for creating a multi-page website with a crypto faucet.
Step four: Select the hosting term: 12 months (saving 71%) you will also receive a domain as a gift and click below on the button «Choose payment method»
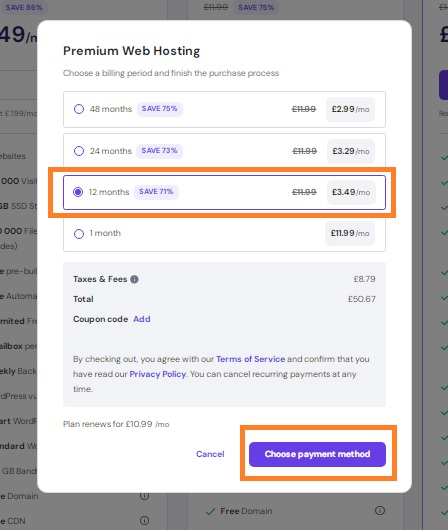
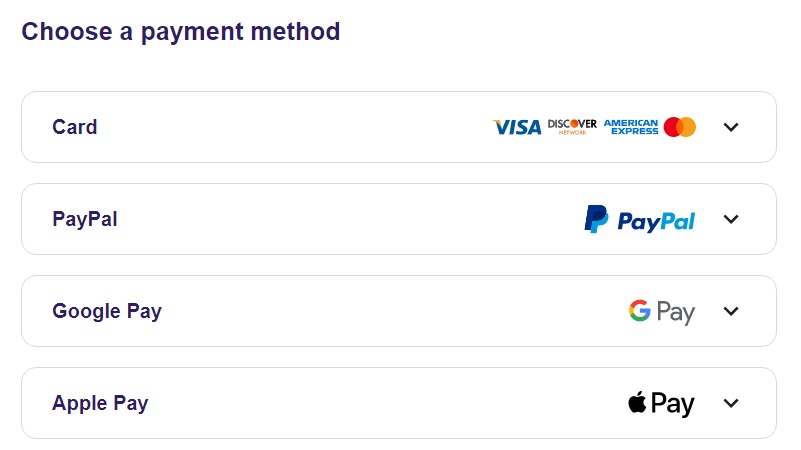
Step five: You can pay for your purchase by card online, PayPal, Google Pay or Apple Pay. After payment, you will be returned to the main page — where the active hosting and its expiration date will be displayed.
🚀 Step 2: Choosing Domain
🔗 How to Claim and Connect Your Free Domain on Hostinger (after purchasing 12+ months of hosting)
📌 Requirement: You must purchase at least 12 months of a hosting plan (e.g., Premium Web Hosting or higher).
✅ Step 1: Buy Hosting
- Go to Hostinger.com
- Choose Premium Web Hosting or a higher plan
- Select a 12-month or longer billing period
- Complete the payment
⸻
✅ Step 2: Claim Your Free Domain 🌐
- After payment, you’ll enter your Hostinger hPanel
- On the dashboard, you’ll see an option to claim your free domain
(If not, go to “Domains” → “Claim Free Domain”) - Enter your desired domain name and click “Search”
- If the domain is available — click “Claim”
📌 Note: You must claim your free domain within 30 days after purchase.
⸻
✅ Step 3: Connect the Domain to Your Site 🔗
- Once claimed, the domain is usually automatically linked to your hosting
- Make sure:
• The domain and hosting are in the same Hostinger account
• Your hosting is active and WordPress (or another CMS) is installed
🔧 In hPanel, go to Websites → select your site → check the Domains tab to confirm the connection
⸻
✅ Step 4 (Optional): DNS Setup
If your domain didn’t link automatically:
- Go to Domains → select your domain
- Open the DNS / Nameservers section
- Set these nameservers:
ns1.dns-parking.com
ns2.dns-parking.com
⸻
All Done! 🎉
You’ve now claimed your free domain and linked it to your hosting.
You can move on to installing WordPress and start building your crypto faucet 🚀
🔧 Step 3: Site setup
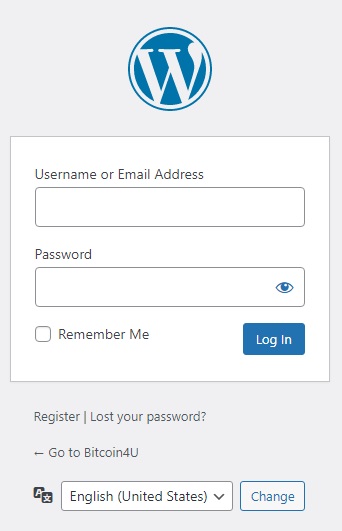
So, after purchasing hosting and registering a domain, you can start setting up your site. To open the admin panel, you need to enter in the browser search bar: https://yoursite.com/wp-admin (replace yoursite.com with your domain)
Step 1: Log in to the WordPress Admin Panel 🔐
Enter your WordPress login and password.
Click “Log In”.
💡 If you just installed WordPress via Hostinger, your login credentials are in your confirmation email or inside your Hostinger dashboard.
Step 2: Install a Lightweight Theme 🎨
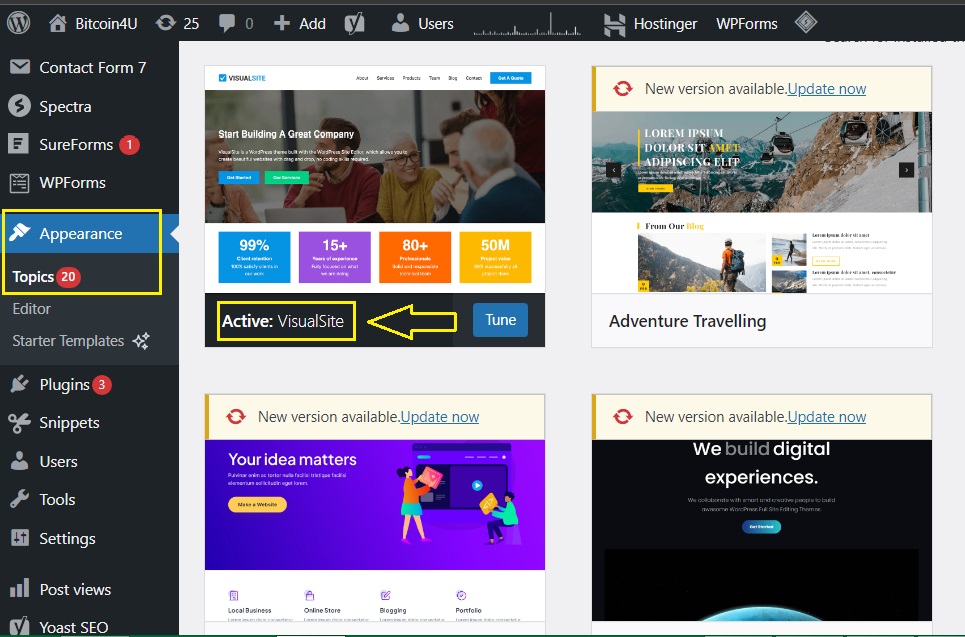
- Go to Appearance → Themes in the left sidebar.
- Click “Add New”.
- Choose a fast, simple theme ( I recommend the theme «VisualSite» ).
- Click “Install”, then “Activate”.
🎯 Important: avoid heavy or bloated themes — faucet sites must load quickly!.
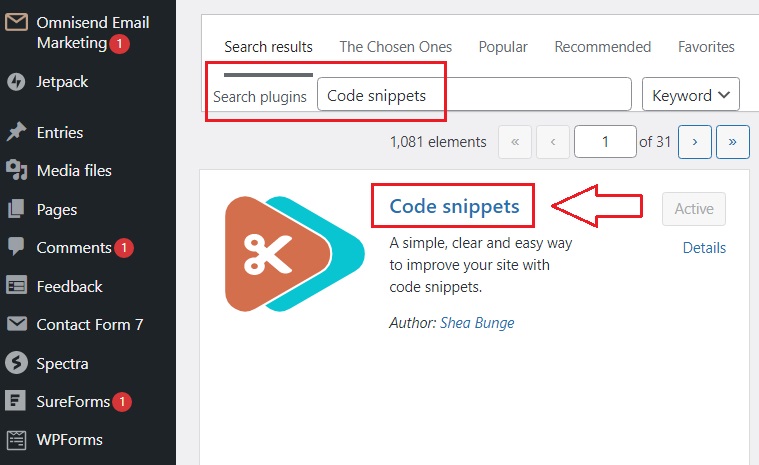
Step 3: Install plugin: «Code snippets»
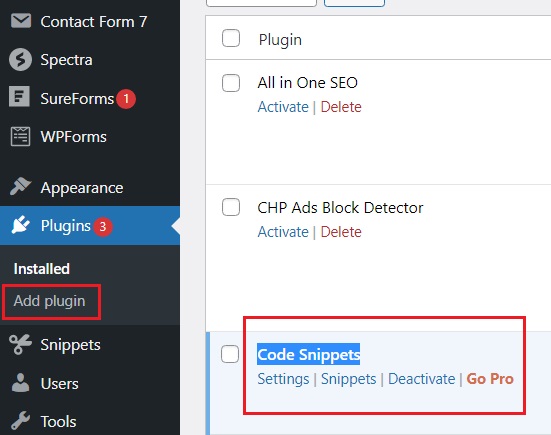
Find: Plugins → Add plugin → in search enter: «Code snippets», install and activate the plugin.
📌 Requirement: 💡 Don’t Place Your Crypto Faucet on the Homepage — Create a Separate Page Instead!
Your website’s homepage is the face of your project. Instead of placing the faucet there, create a dedicated page for it (for example, /faucet) and use the homepage as a full-featured content hub:
• 📰 Publish news from the world of crypto and finance
• 📈 Post reviews of coins and exchanges
• 🧠 Share useful guides and tips on earning with cryptocurrency
Later, as your site starts receiving stable traffic, you can turn it into a real crypto news portal, attract advertisers, and earn through monetization (AdSense, affiliate links, native ads, etc.).
This approach helps you:
• ✅ Increase trust and authority
• ✅ Improve SEO performance
• ✅ Earn 3–5x more than with the faucet alone.
Design setup and preparation
⚙️ Essential WordPress Settings Before You Launch
After installing WordPress, go to your admin dashboard (yourdomain.com/wp-admin) and configure the key settings that will help you build a professional, scalable crypto website.
⸻
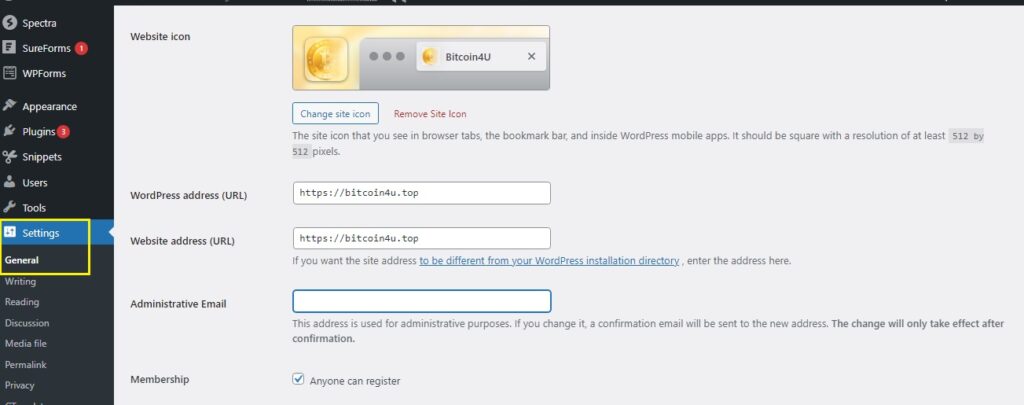
1️⃣ Settings → General
• Site Title: Choose a broad and flexible name that isn’t limited to just a faucet. Examples: CryptoWorld, Bitcoin4U, CryptoMonitor, What’s Next for Bitcoin.
• Tagline: Example: The latest in crypto news and Bitcoin faucets.
• Make sure your WordPress Address (URL) and Site Address (URL) are correct (https://…).
⸻
2️⃣ Permalinks
• Go to Settings → Permalinks
• Select Post name — this makes your URLs clean and SEO-friendly:
yourdomain.com/create-a-crypto-faucet/
⸻
3️⃣ Homepage Setup
• Go to Settings → Reading
• Set Your homepage displays → A static page
• Create a page titled Home or Crypto News — this will be your main page
• Create a separate page for your faucet, such as /faucet/ or /moonbitcoin/
⸻
4️⃣ Language & Timezone
• Set your language (e.g., English, Czech)
• Set your timezone (e.g., UTC+2 or Prague)
⸻
5️⃣ Security & Comments
• Disable open comments if not running a blog
• Install a free security plugin like Wordfence or Limit Login Attempts Reloaded
⸻
6️⃣ Add a Favicon
• Upload a 32×32 PNG icon for your site logo
• Go to Appearance → Customize → Site Identity
• Set your Site Icon (favicon) — this appears in browser tabs and improves trust
⸻
🔑 Key Tip: Don’t place your faucet on the homepage. Use the homepage for crypto news, analysis, or blog posts — it gives your site more flexibility, authority, and better monetization potential in the long term.
🔧 Useful Plugins for a WordPress Website
If you’re creating a website for a crypto faucet, crypto news, or monetization — here are essential plugins to install for security, performance, SEO, and ads.
⸻
🔒 Security
- Wordfence Security – Protects your site from hacking, malware, brute-force attacks
- Limit Login Attempts Reloaded – Blocks repeated login attempts
- WP Cerber Security – Advanced protection and bot blocking (alternative to Wordfence)
⸻
⚡️ Speed Optimization
- WP Fastest Cache or LiteSpeed Cache – Caches your pages to boost speed
- Autoptimize – Minifies HTML, CSS, and JS files
- Smush – Compresses and optimizes images without quality loss
⸻
🧰 General Tools
- Classic Editor – Brings back the old WordPress editor (optional)
- WPForms Lite – Easy contact form builder
- Redirection – Manage 404 errors and setup URL redirects
- Really Simple SSL – Automatically enables HTTPS on your site
⸻
💰 Monetization
- Ad Inserter – Add ad code (e.g., Google AdSense, banners, shortlinks) anywhere
- Advanced Ads – Full-featured ad management and placement
⸻
📈 SEO & Analytics
- Rank Math SEO (or Yoast SEO) – Optimize posts, pages, and meta tags for search engines
- Site Kit by Google – Official Google plugin for Analytics, AdSense, and Search Console
⸻
For Crypto Faucet Websites
- Shortlink Manager – Manage and rotate shortlinks for earnings
- Insert Headers and Footers – Add scripts like FaucetPay API or ad tags without touching code
🔧 Step 4: Faucet setup
🔧 Starting Faucet Setup with Monetization
Before you start attracting users, it’s essential to think about how your faucet will make money. One of the most effective methods is monetization through shortlink services.
I’ve personally tested and selected reliable shortlink platforms that integrate perfectly into the CLAIM button.
💡 Here’s how it works:
To receive their reward (satoshis), the user must first go through a shortlink — it’s a required step. The system randomly chooses one of the available shortlink providers, and you get paid for every visit.
🔁 So basically:
• The user is happy because they get their coins
• You earn from every click
• And everything runs on autopilot
This is one of the most stable and fair monetization methods for a faucet, especially in the early stages before heavy ad traffic starts rolling in.
Here is a list of resources, register on each of them
🔗 Shrinkearn.com
🔗 Shrinkme.io
🔗 Exe.io
🔗 Smoner.com
🔗 Shrink.pe
🔗 Clk.sh
I also recommend registering on adsterra.com, this remur allows you to earn money by displaying advertising banners (The best alternative to Google Adsense). Please note that high-quality, full-fledged sites are accepted, so you can connect your project later, when it has enough content.
Creating a faucet
Let’s start with the main code of the BCH crypto faucet: first, I recommend testing the ready-made example — Open the BCH faucet 🔗
Step 1: Create a new page, give it the shortest name possible: Moonbch, Freebch, bchfaucet.
To create a new page, in the WordPress admin console, find → Pages → Add page. Then in the title field, write the name of the page.
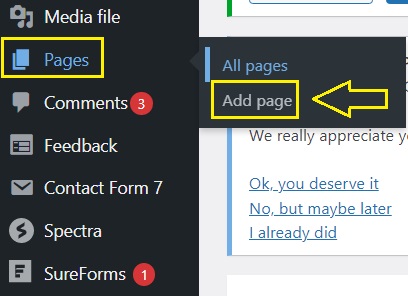
Now, under the title, click on +, find: «Cover» in the search, and set the background color to black.
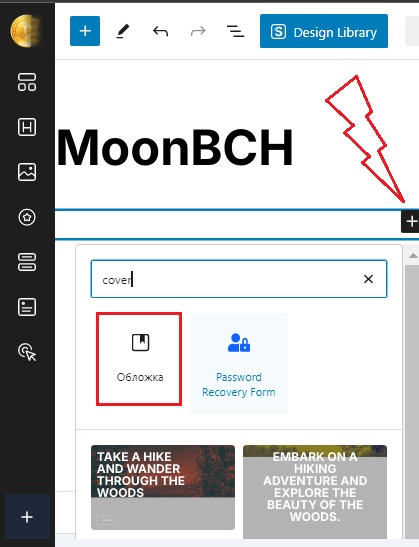
On the created cover — delete the field for creating a title. Then click on + and select «Paragraph» in the created field enter: MoonBCH Faucet. Under the name, click on + again and select: «Image» — upload your faucet logo and set the appropriate size.
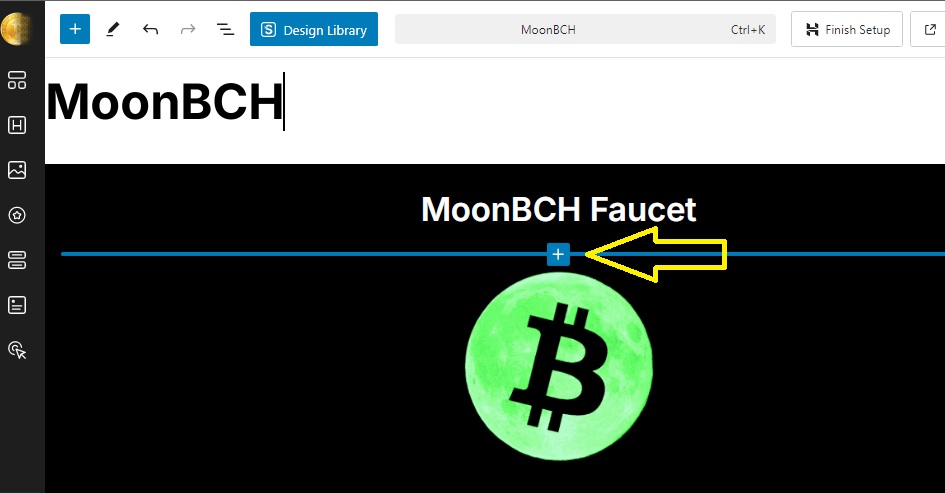
Below you can download a ready-made logo for your faucet:

Now between the faucet name and logo click on + and select: «Custom HTML» Copy and paste the code you will find below:
<!DOCTYPE html>
<html lang="en">
<head>
<meta charset="UTF-8">
<title>Faucet balance</title>
<style>
body {
background-color: #111;
color: #fff;
font-family: sans-serif;
text-align: center;
margin-top: 100px;
font-size: 20px;
}
.highlight {
color: #ffd700;
}
</style>
</head>
<body>
<div>Faucet balance: <span id="balance" class="highlight"> 0</span> satoshi BCH</div>
</body>
</html>
This code makes the faucet page completely black, and also displays the current balance — which you can enter manually. To do this, in the line of code:
Faucet balance: <span id=»balance» class=»highlight»> 0
change 0 to your value
Now you need to save the data and create a page — in the upper right corner, click on the button: «Save»
After that — go to the page — which you just created — and in the search bar of the browser, copy the entire link.
For example, your link looks like this:
https://bitcoin4u.top/moonbtc-faucet/
You need to add at the end of the link: ?verify=1
The full link should look like this:
https://bitcoin4u.top/moonbtc-faucet/?verify=1
Copy the received link and shorten it one by one on six link shortening services.
Each short link must be copied and pasted into a text editor one by one.
Short links should look like this: https://tpi.li/Moonbtc
💡In the end, you should have six short links.
Now copy this php code and paste it into the text editor:
function moonbch_simulator() {
$is_logged = is_user_logged_in();
$now = time();

if ($is_logged) {
$user_id = get_current_user_id();

// Реферал по ID
if (isset($_GET['ref']) && empty(get_user_meta($user_id, 'moonbch_referrer', true))) {
$ref_id = intval($_GET['ref']);
if (get_userdata($ref_id)) {
update_user_meta($user_id, 'moonbch_referrer', $ref_id);
}
}

// Верификация
if (isset($_GET['verify'])) {
update_user_meta($user_id, 'moonbch_verified', 1);
}

$verified = (int) get_user_meta($user_id, 'moonbch_verified', true) === 1;
$last_claim = (int) get_user_meta($user_id, 'moonbch_last_claim', true);
if ($last_claim == 0) {
update_user_meta($user_id, 'moonbch_last_claim', $now);
$last_claim = $now;
}

$seconds = $now - $last_claim;
$reward = floor(log($seconds + 1) * 5);
$claim_allowed = $verified && $seconds >= 60;

if (isset($_POST['mb_claim']) && $claim_allowed) {
$balance = (int) get_user_meta($user_id, 'moonbch_balance', true);
update_user_meta($user_id, 'moonbch_balance', $balance + $reward);
update_user_meta($user_id, 'moonbch_last_claim', $now);
update_user_meta($user_id, 'moonbch_verified', 0);
$seconds = 0;
$reward = 0;

$referrer_id = get_user_meta($user_id, 'moonbch_referrer', true);
if (!empty($referrer_id)) {
$bonus = floor($reward * 0.25);
$ref_balance = (int) get_user_meta($referrer_id, 'moonbch_balance', true);
update_user_meta($referrer_id, 'moonbch_balance', $ref_balance + $bonus);
}
}

$balance = (int) get_user_meta($user_id, 'moonbch_balance', true);
$ref_link = 'https://bitcoin4u.top/moonbch/?ref=' . $user_id;

$ref_users = get_users([
'meta_key' => 'moonbch_referrer',
'meta_value' => $user_id,
'number' => -1,
'fields' => 'ids'
]);

$referral_count = count($ref_users);
$referral_earnings = 0;
foreach ($ref_users as $ref_user_id) {
$ref_balance = (int)get_user_meta($ref_user_id, 'moonbch_balance', true);
$referral_earnings += floor($ref_balance * 0.25);
}

} else {
$verified = false;
$seconds = 0;
$reward = 0;
$claim_allowed = false;
$balance = 0;
$ref_link = 'Available after registration';
$referral_count = 0;
$referral_earnings = 0;
}

return "
<style>
.verify-btn {
font-size: 20px;
font-weight: bold;
padding: 12px 30px;
background-color: #ffcc00;
color: black;
border: none;
border-radius: 6px;
margin-top: 10px;
transition: 0.3s;
text-align: center;
line-height: 1.4;
display: inline-block;
}
.verify-btn:hover {
background-color: #e6b800;
cursor: pointer;
}
</style>

<div style='text-align:center; font-size:20px; color:white; max-width:600px; margin:auto;'>
<p style='font-weight:bold; font-size:24px;'>⏱ Time since last claim: <span id='mb-seconds'>{$seconds}</span> sec</p>
<h2 style='color:yellow;'>₿ Current reward: <span id='mb-reward'>{$reward}</span> satoshi</h2>

<form method='post'>
<input type='submit' name='mb_claim' value='CLAIM'
style='font-size:18px; padding:10px 30px; background-color:" . ($claim_allowed ? "green" : "gray") . "; color:white; border:none; border-radius:5px;' " . ($claim_allowed ? "" : "disabled") . ">
</form>

" . (!$verified && $is_logged ? "
<p style='color:yellow; margin-top:30px;'>To enable CLAIM, please verify:</p>
<div style='margin-top:10px; margin-bottom:15px;'>
<a id='verify-link' href='#' target='_blank'>
<button class='verify-btn'>✅ Verify via Shortlink</button>
</a>
</div>
" : "") . "

<h2 style='margin-top:30px;'>📦 Balance: {$balance} satoshi</h2>
<h2>👥 Referrals: {$referral_count}</h2>
<p>💰 Referral earnings (estimated): {$referral_earnings} satoshi</p>

<form method='post'>
<input type='submit' name='mb_withdraw' value='Withdraw to FP'
style='font-size:18px; padding:10px 30px; background-color:" .
($balance >= 30000 ? "#4CAF50" : "gray") . "; color:white; border:none; border-radius:5px; margin-top:10px;' " .
($balance >= 30000 ? "" : "disabled") . ">
</form>

<p>Your referral link: <input type='text' readonly value='{$ref_link}' style='width:80%; text-align:center;'></p>
<p>Earn 25% from every referral claim!</p>

" . (!$is_logged ? "
<p style='margin-top:20px;'>🔐 Want to save your progress and get your own referral link?</p>
<a href='" . wp_registration_url() . "?redirect_to=" . site_url('/moonbch') . "'>
<button style='font-size:20px; padding:14px 35px; background-color:#4CAF50; color:white; border:none; border-radius:6px; margin-top:15px; font-weight:bold; box-shadow: 0 4px 8px rgba(0,0,0,0.2); cursor:pointer;'>
🚀 Register Now
</button>
</a>
" : "") . "
</div>

<script>
setInterval(function() {
var sec = document.getElementById('mb-seconds');
var rew = document.getElementById('mb-reward');
var seconds = parseInt(sec.innerText) + 1;
sec.innerText = seconds;
rew.innerText = Math.floor(Math.log(seconds + 1) * 5);
}, 1000);

document.addEventListener('DOMContentLoaded', function () {
const links = [
'https://tpi.li/Moonbch',
'https://shrinkme.ink/Moonbch',
'https://exe.io/Moonbch',
'https://smoner.com/Moonbch',
'https://lnbz.la/Moonbch',
'https://oii.la/Moonbch'
];
const randomLink = links[Math.floor(Math.random() * links.length)];
const linkElement = document.getElementById('verify-link');
if (linkElement) {
linkElement.href = randomLink;
}
});
</script>
";
}
add_shortcode('moonbch', 'moonbch_simulator');
Now find the following fragment in the code:
document.addEventListener(‘DOMContentLoaded’, function () {
const links = [
‘https://tpi.li/Moonbch’,
‘https://shrinkme.ink/Moonbch’,
‘https://exe.io/Moonbch’,
‘https://smoner.com/Moonbch’,
‘https://lnbz.la/Moonbch’,
‘https://oii.la/Moonbch’
];
const randomLink = links[Math.floor(Math.random() * links.length
In this code fragment, insert your short links.
These links are located in the button: Verify via Shortlink, after each request for a reward — these links change automatically.
Which allows you to avoid blocking your account on link shortening services,
and most importantly, to get more income.
You can see an example here >>
So, if your php is ready, open the WordPress admin panel, find the Shippets section and click «Add new»
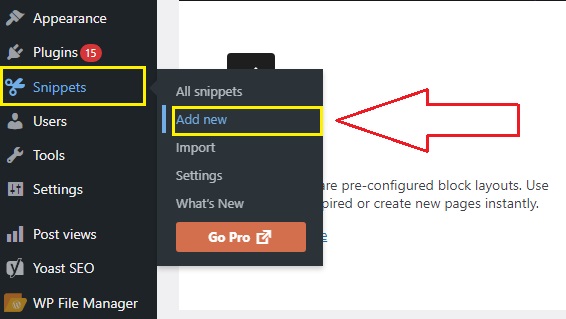
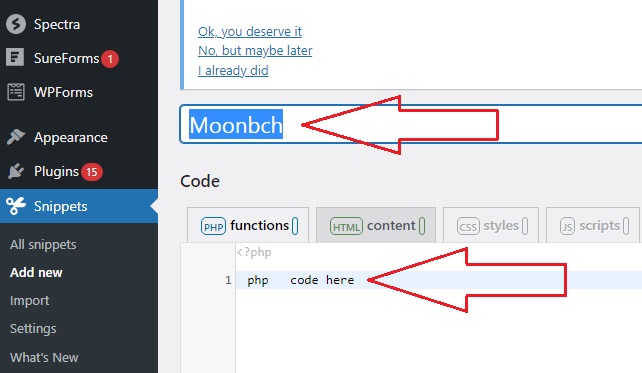
Enter the snippet name (Moonbch) and paste the php code below:
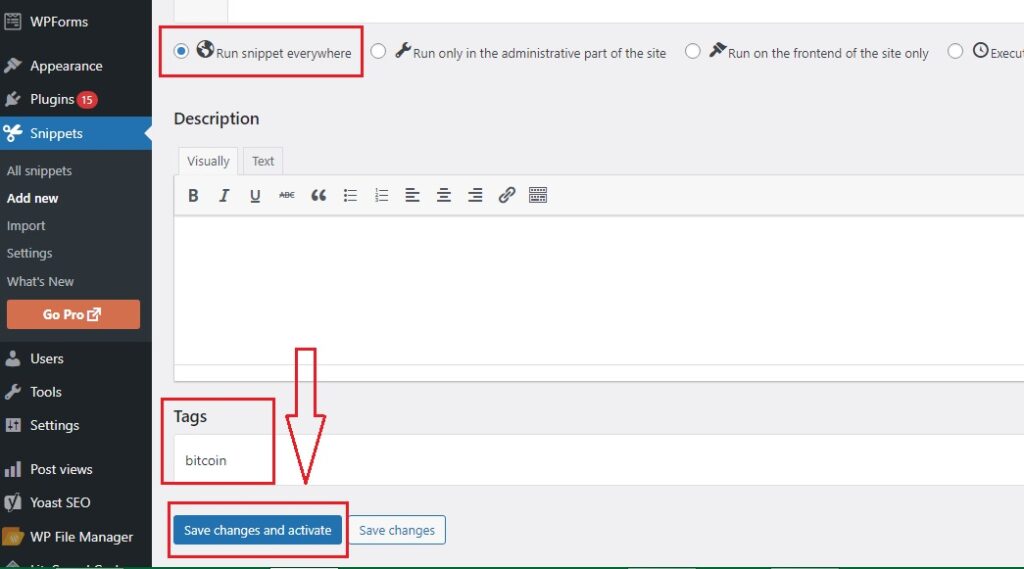
Now, on the same page, go down a little lower, check the box next to: Run snippet everywhere, in the «Tags» field you can write keywords separated by commas, for example — Bitcoin, earnings on the Internet. After that, click on the button: «Save changes and save».
Next, open your faucet page and click on the item at the top center: «Edit page»
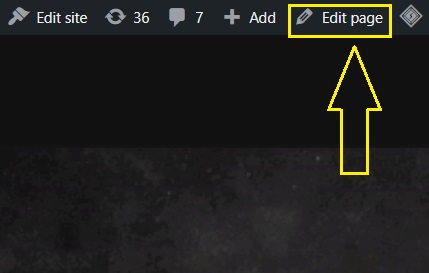
Below the last block with HTML, click on the plus, select the section: short code and paste this code into the field:
paste this code: [moonbch]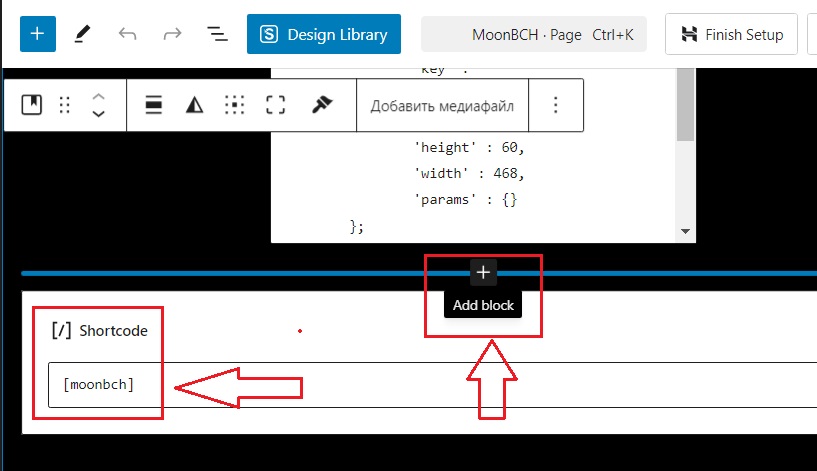
Right away — under the block, click on the plus, select any HTML and insert the element: <br>
this allows you to make an indent between paragraphs.
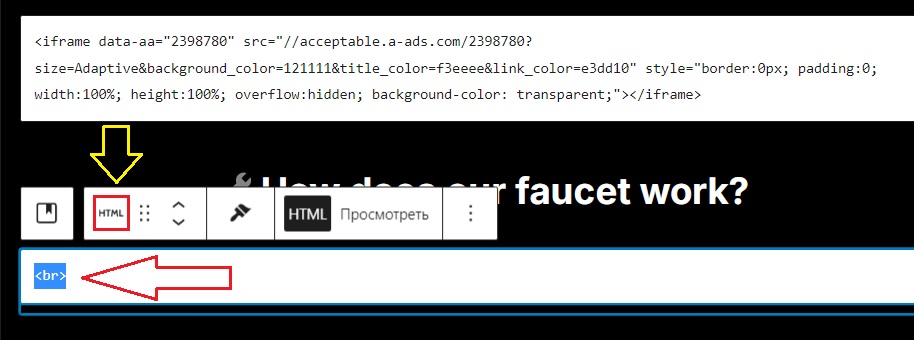
Under the HTML block, click on the plus and select the block: «Heading»
copy the text below and paste it into the field that opens
🔧 How does our faucet work?
Now we create a block for HTML, copy the code below and paste it into the block:
<br>
<p>
Welcome! Our BCH faucet is designed to let everyone earn free satoshi (small fractions of BCH) just by being active and viewing short ads.
</p>

<p>
📌 <strong>Quick Registration</strong><br>
Registration takes just a few seconds. Once registered, you’ll have access to your personal account with your balance and reward progress.
</p>

<p>
💰 <strong>Automatic Satoshi Accumulation</strong><br>
Satoshi start accumulating automatically from the last claim. The longer you wait, the more you earn — the reward grows with time!
</p>

<p>
🔗 <strong>Shortlink Verification</strong><br>
To activate the CLAIM button, simply complete a short verification by viewing a shortlink ad. This step is essential — ads are what power the faucet and generate rewards.
</p>

<p>
💸 <strong>Instant Withdrawals</strong><br>
As soon as you reach <strong>30,000 satoshi BCH</strong>, you can instantly withdraw your balance to your <strong>FaucetPay</strong> wallet with just one click.
</p>

<p>
👥 <strong>25% Referral Program</strong><br>
Invite friends and earn more! For every claim your referrals make, you receive <strong>25% of their reward</strong> — automatically and forever. Your personal referral link will be available right after registration.
</p>

<hr style="margin: 20px 0; border: 1px dashed #ccc;">

<p style="color:#ffcc00;">
❗ <strong>IMPORTANT</strong><br>
🚫 <strong>Do not use AdBlock!</strong><br>
Ad blockers interfere with the faucet’s functionality. This may result in:
</p>
<ul style="list-style:none; padding:0; text-align:center;">
<li>– balance not updating properly;</li>
<li>– reward claim not working;</li>
<li>– in some cases — balance may reset to zero.</li>
</ul>

<p>
🎯 The faucet depends entirely on <strong>ad views</strong>.<br>
This is the only way we can reward our users.<br>
Please support the project by disabling your ad blocker!
</p>

</div>
And finally, you need to install three scripts that automatically update the page, block the use of adblocks, cheating bots. We create two blocks for HTML in turn, and insert these two codes separately from each other:
Code 1
<script>
setTimeout(function() {
if (window.location.href.includes('?verify=1')) {
window.history.replaceState({}, document.title, window.location.origin + window.location.pathname);
}
}, 300000); // 5 минут = 300 000 мс
</script>
Code 2
<script>
setInterval(function() {
location.reload();
}, 360000); // 6 минут = 360 000 мс
</script>
Code 3
<script>
(function () {
const KEY = 'antiAdblock.dismissedUntil';
const ttlMs = 7 * 24 * 60 * 60 * 1000; // 7 days

function log(...a){ try{ console.log('[antiAdblock]', ...a);}catch(_){} }

function injectStyles() {
if (document.getElementById('ab-styles')) return;
const css = `
.ab-bar{position:fixed;left:0;right:0;bottom:0;z-index:2147483647;
padding:12px 16px;background:#111;color:#fff;
font:14px/1.4 system-ui,-apple-system,Segoe UI,Roboto,Arial;
box-shadow:0 -6px 20px rgba(0,0,0,.3)}
.ab-row{display:flex;gap:12px;align-items:center;justify-content:space-between;flex-wrap:wrap}
.ab-msg{max-width:900px}
.ab-actions{display:flex;gap:8px;flex-wrap:wrap}
.ab-btn{padding:8px 12px;border-radius:6px;border:1px solid #555;background:transparent;color:#fff;cursor:pointer}
.ab-link{padding:8px 12px;border-radius:6px;text-decoration:none;background:#fff;color:#111;font-weight:600}
.ab-close{position:absolute;right:8px;top:8px;background:transparent;border:none;color:#fff;
font-size:20px;cursor:pointer}
@media (max-width:480px){ .ab-msg{max-width:100%} }
`;
const st = document.createElement('style');
st.id = 'ab-styles';
st.appendChild(document.createTextNode(css));
document.head.appendChild(st);
}

function dismissed() {
const until = parseInt(localStorage.getItem(KEY) || '0', 10);
return until > Date.now();
}

function rememberDismiss() {
localStorage.setItem(KEY, String(Date.now() + ttlMs));
}

function detectAdblock() {
// Bait element (popular ad-class names are often hidden by blockers)
const bait = document.createElement('div');
bait.className = 'ad ads adsbox ad-banner ad-container sponsor advertising';
bait.style.cssText = 'position:absolute;left:-9999px;width:1px;height:1px;pointer-events:none;';
document.body.appendChild(bait);

const cs = getComputedStyle(bait);
const blocked = (
cs.display === 'none' || cs.visibility === 'hidden' ||
bait.offsetHeight === 0 || bait.offsetWidth === 0
);
bait.remove();
return blocked;
}

function buildBar() {
injectStyles();

const bar = document.createElement('div');
bar.className = 'ab-bar';
bar.setAttribute('role', 'dialog');
bar.setAttribute('aria-live', 'polite');
bar.setAttribute('aria-label', 'AdBlock notice');

const row = document.createElement('div');
row.className = 'ab-row';

const msg = document.createElement('div');
msg.className = 'ab-msg';
msg.textContent = 'Please disable AdBlock — it interferes with the site’s functionality.';

const actions = document.createElement('div');
actions.className = 'ab-actions';

const howto = document.createElement('button');
howto.type = 'button';
howto.className = 'ab-btn';
howto.textContent = 'How to allow this site';
howto.addEventListener('click', function () {
alert('Open your ad blocker settings and add this site to the allowlist (Whitelist / Allowlist / Trusted sites). The option name may vary by extension.');
});

const close = document.createElement('button');
close.type = 'button';
close.className = 'ab-close';
close.setAttribute('aria-label', 'Close notification');
close.textContent = '×';
close.addEventListener('click', function () {
rememberDismiss();
bar.remove();
log('Banner closed (remembered for 7 days)');
});

actions.appendChild(howto);
row.appendChild(msg);
bar.appendChild(row);
bar.appendChild(actions);
bar.appendChild(close);
document.body.appendChild(bar);
log('Banner injected');
}

function init() {
const params = new URLSearchParams(location.search);
const force = params.has('showAdblockBanner'); // test via ?showAdblockBanner=1

if (force) {
localStorage.removeItem(KEY);
buildBar();
return;
}

if (dismissed()) {
log('Recently dismissed — skipping');
return;
}

const blocked = detectAdblock();
log('AdBlock detected =', blocked);
if (blocked) buildBar();
}

if (document.readyState === 'loading') {
document.addEventListener('DOMContentLoaded', init);
} else {
init();
}
})();
</script>
Now, at the top right, click the «Save» button
go to the faucet page and check that everything is displayed correctly and also test the process. I also recommend testing it on your smartphone.
🔧 Advertising on the website
How to Add Ads to a Faucet and Earn Money
If you have a faucet site, the easiest and fastest way to monetize it is by using A-ADS (Anonymous Ads). This is a cryptocurrency ad network that is perfect for such projects:
 payouts are made directly in Bitcoin;
 setup takes only a couple of minutes;
 no documents or verification required;
 works even on sites that AdSense does not accept.
 Step 1. Create an Account
- Go to A-ADS.
- Register with your email or simply with your Bitcoin address.
 Step 2. Create an Ad Unit
- In the menu, select Publishers → Create Ad Unit.
- Choose a name (e.g., “Faucet Sidebar”).
- Select the format:
- 300×250 (universal banner),
- 728×90 (header),
- 160×600 (sidebar).
- Save it and copy the ad code (iframe or script).
Example:
<iframe data-aa="123456" src="//ad.a-ads.com/123456?size=300x250"
        scrolling="no" style="width:300px; height:250px; border:0; padding:0; overflow:hidden;"
        allowtransparency="true"></iframe>
Step 3. Insert the Code into WordPress
- Via Widget: In the admin panel → Appearance → Widgets → add a Custom HTML block and paste the code.
- In a Post/Page: In the editor → add a Custom HTML block.
- Via a Plugin (Ad Inserter / Insert Headers and Footers): convenient if you want to place ads automatically in multiple locations.
 Why A-ADS is Better for Faucets
No site moderation like Google AdSense.
Very simple: just paste one code and ads are live.
Bitcoin payments directly to your wallet.
Full anonymity.
If everything is ready, you can launch the project
Attention!
If you have any difficulties creating a project, or you want to create a site but you have no experience with WordPress, you can contact the administrator for help — by writing to the mail: Bitcoin4u.top@gmail.com
.
